How to Safely Install Concertina Wire for Maximum Security
How to Safely Install Concertina Wire for Maximum Security
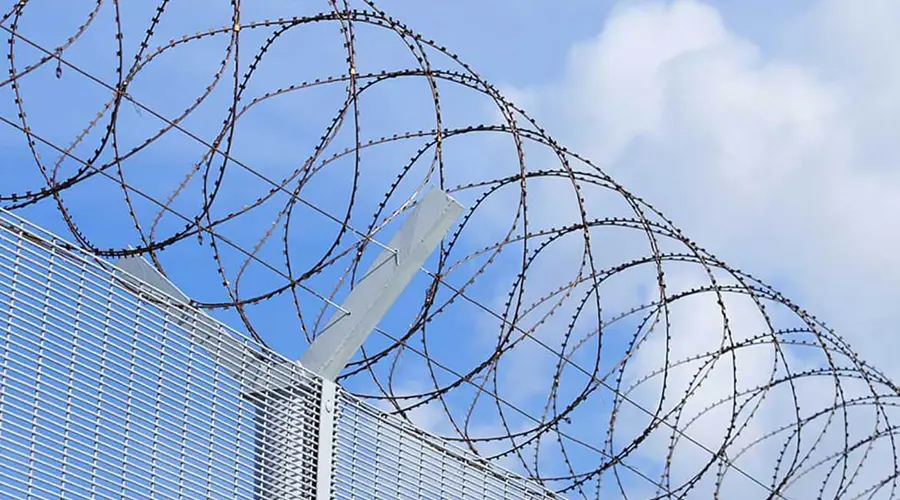
Picture this: a dark night with intruders eyeing your property. You need a tough barrier that stops them cold. Concertina wire, also called razor wire, rises to the challenge. It coils like a spring and packs sharp blades that slice through attempts to breach. Unlike basic barbed wire, which might just slow someone down, this stuff creates real pain and forces a rethink. We wrote this guide to walk you through safe installation steps. You'll get tips for top security while keeping things legal and hazard-free.
Understanding Concertina Wire and Pre-Installation Legalities
Types of Concertina Wire and Their Applications
Concertina wire comes in a few main styles to fit different needs. Single coil versions work well for basic setups around warehouses. They form a simple roll that's easy to handle. Double coil designs stack two layers for extra height and tangle. Flat wrap types lie flat against walls or fences in tight spots.
Pick the right one based on your site. High-security spots like prisons often use double coils for that extra wall of defense. General industrial areas might stick with single coils to save costs without losing much punch.
Go for galvanized steel in wet climates to fight rust. Stainless steel lasts longer in salty air near coasts. Check the gauge too—thicker ones hold up better against cuts from tools or weather.
Legal Compliance and Local Ordinances
Rules for putting up concertina wire change by area. Most places cap height at eight feet to avoid neighbor fights. Keep it away from roads or paths by at least ten feet. Some towns demand clear views so folks don't walk into it by mistake.
Break these rules, and you face fines or lawsuits. Think of that factory owner who skipped permits. His wire snagged a delivery truck, leading to big repair bills and court time. Always call your local building office first. Get permits in hand before you start.
Essential Safety Protocols Before Handling
Safety gear keeps you out of the emergency room. Wear heavy leather gloves to shield your hands from those razor edges. A full-face shield blocks flying bits during cuts or stretches. Long sleeves, pants, and sturdy boots cover your skin and feet.
This wire doesn't forgive slips. One wrong grab means deep cuts that need stitches. Train your team on basics too. Keep a first-aid kit close with bandages for quick fixes.
Preparing the Installation Site and Mounting Hardware
Selecting and Securing Support Structures
Strong posts make or break your setup. Concertina wire pulls hard outward, so weak supports sag fast. Use metal posts at least four inches thick, sunk three feet deep in firm soil. Reinforced concrete works for walls or heavy gates.
Space posts every six to eight feet for even pull. Test the ground first—soft dirt needs deeper digs or extra braces. This setup stops the whole line from drooping over time.
Correct Placement of Anchoring and Tension Hardware
Hardware holds everything tight. Anchor clips grip posts without slipping. For double coils, add spreader arms to keep layers apart. Run heavy-duty tension wire along the top to link it all.
Stick to galvanized or stainless steel parts. Rust eats cheap metal quick, leading to breaks. Place clips every two feet for solid hold. Load spreads out like weight on a bridge—poor spots cause weak links that fail first.
Establishing Safe Working Zones
Clear the area before you lift a coil. Set up exclusion zones with bright orange caution tape. Keep folks at least twenty feet back from the work line.
Watch for overhead risks near buildings or trees. Ground crew should know the plan to dodge falls or snags. This keeps accidents low and work smooth.
The Step-by-Step Installation Process
Uncoiling and Initial Attachment Techniques
Start slow with uncoiling. Lay the coil flat and cut the ties with heavy shears. Let it expand bit by bit to avoid wild snaps. Secure the first end to a post using a strong clip.
Hook it tight but not too much at first. Walk the coil along as a team—one person guides, others support. Use a tension tool made for razor wire. It beats pliers that slip and cut.
Maintaining Tension and Spacing (The Critical Phase)
Tension is key to a strong barrier. Pull the coil steady as you go, keeping loops about six inches apart. This stops climbers from grabbing easy holds.
At each post, loop it over and clip secure. For turns, bend gently to match the angle without kinks. Check sag every ten feet—fix it right away. Even pull makes the whole run stand firm like a stretched spring.
Double coils need extra care. Stretch the inner one first, then add the outer. Spreader arms lock them in place for max tangle effect.
Securing the Final Termination Point
Reach the end and cut the wire with bolt cutters. Wear thick gloves—those blades fight back. Crimp the last clip or tie a heavy knot to seal it.
Tuck any sharp ends under wraps or tape them down. No loose bits mean less risk for you or wind damage. Step back and eye the line for straight runs.
Advanced Configurations and Height Optimization
Creating the Overhang for Topping Fences
Boost your fence with an overhang. Bolt cantilever arms to the top rail, angled out at forty-five degrees. Stretch the wire across them, facing down like a thorny roof.
This setup stops ladder climbs cold. Military bases use it often—steep drops make scaling a nightmare. Keep arms strong to handle the wire's weight and wind.
For walls, flat wraps work under the overhang. Layer them for double trouble without extra height.
Integrating Warning Signage
Signs save headaches later. Post "Danger: Razor Wire" boards every fifty feet, facing out. Use big red letters on white for clear sight.
"No Trespassing" adds legal bite. Rules often say signs must glow or reflect at night. This warns off casual walkers and covers you in court.
Post-Installation Inspection Checklist
Run a full check once done. Here's what to look for:
- Tension Test: Pull spots by hand. No give means it's tight.
- Loose Ends Hunt: Scan for any pokey bits. Cover them all.
- Anchor Check: Tug each clip. They should hold firm.
- Gap Scan: Look at base and corners. Seal any holes with extra wire.
- Height Measure: Confirm it tops out right per local rules.
Fix issues on the spot. A quick walk-around catches problems early.
Conclusion: Maintaining a High-Security Barrier
Precision turns concertina wire into a real shield. Sloppy jobs let intruders slip through and pile on risks. Follow these steps, and your perimeter stays solid for years.
Top priorities boil down to three: stick to local laws, gear up with right PPE and tools, and nail that tension every time. It's a smart buy for peace of mind. Ready to fortify your site? Grab your permits and get started—secure what matters most.
OUR CLIENTS,
OUR LEGACY OF TRUST.